|
RAIL EXTRUDE TOOL
|
|
A while back I was asked - "How do I make a pipe - I mean a real bendy
pipe following loads of twists and turns?".
Now most people would probably make a cylinder with an appropriate number of divisions and then
use the bend tool in a select few areas to achieve what they're looking for - this
can be tedious however. Another technique is to knife a cross section or two
where you'll need a bend and then use rotate on the cross section points etc.. etc.. - All
perfectly acceptable - but time constraining and they don't yield brilliant smooth surface
results. Now how can we do this easily?
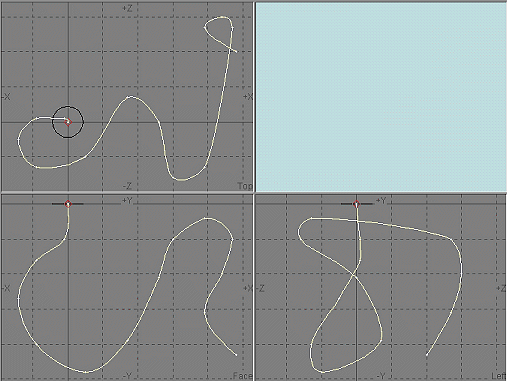
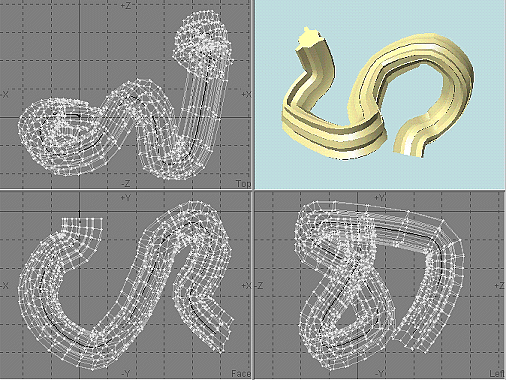
If you haven't already - boot up Modeller and in the first layer make a disc - a simple flat
one-poly disc - size doesn't matter. Now go to Layer two - with Layer one (The Disc) as the
background layer. Make a spline curve with the first point near the center of the disc in the
view that you're making the curve in.
The easiest way to make a spline curve is to go to Polygon menu - Points and then
right click where you want the points to be - when finished press "CTRL" & "p" and
you'll make a spline curve. Then manipulate the points in all views to get a nice wiggly
curve - a bit like this:
|
|
|
now we should pause to understand a bit about this extrude tool and the
options menu that you'll get when you choose rail extrude.
When you extrude -- the polygon that you're extruding must be
selected (or everything in the active layer will be extruded) and it must be in the
top layer with the curve in the bottom or background layer - as the
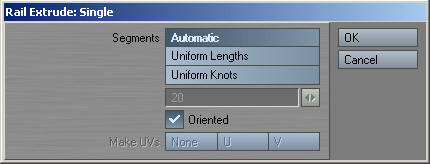
extrusion will follow the curve. When you press rail extrude - you'll see this
Menu:
|
|
|
|
For best results the polygon to be extruded should be at the start of
the curve and perpendicular to it - but this isn't written in stone. Now as for the
segments: segments are basically the number of divisions or "slices" along
the length of the extrusion
-
Automatic: This will distribute the divisions at optimal
spacing as per the orientation of the curve
-
Uniform Lengths: This will distribute the divisions at equal
distances regardless of the shape of the curve
-
Uniform Knots: This will distribute the divisions evenly
between the Knots {points} of the curve
-
Orientation -This is an important one:-- when activated the
divisions will orient themselves to the shape of the curve - necessary for a good
pipe - when this option is off the poly's will be extruded but will stay the same
as the original - they'll follow the curve but they'll stay "flat"
For Lengths and Knots when using these options you specify the number of divisions manually
depending on what you require.
|
Right let's look at what happens with each of these options:
The step for making the extrusion is the same for each case - you have the
poly in the foreground, the curve in the background and select Rail extrude: Please bear
in mind that you may have to flip the polygon to get the mesh to look correct - I find
that generally the Poly' should face away from the start point. You can also flip the
start point of the curve.
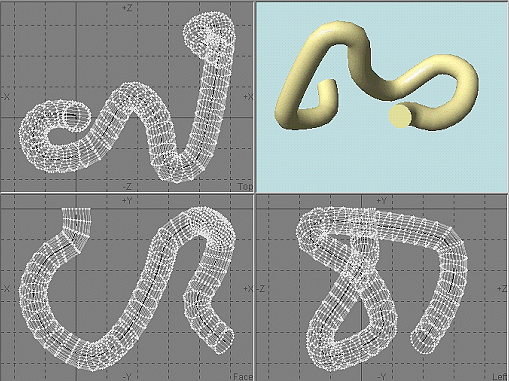
When left on Automatic with Orientation on:
|
|
|
A nice smooth pipe! (smoothing angle for pipes - 60 degrees usually
gives great results) - now if Polygon count isn't a problem - you're done right here! But
if it is - create the original disc with fewer poly's and we can specify the divisions
manually with Lengths and Knots:
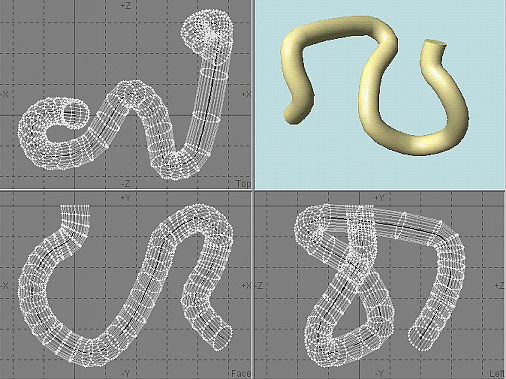
When using lengths - pick say 60 divisions and leave orientation on
and you'll get this
|
|
|
As you can see more or less the same - but with the divisions evenly
spaced along the length of the curved mesh. Now there are straightish bits of pipe
where divisions aren't really necessary - so what can we do?
Right - this time we'll use Knots with 50 divisions and
orientation left on:
|
|
|
As you can see visually almost the same but with 240 polygons less
than the other.
Think about the possibilities - you're not limited to just discs - for
example:
|
|
|
Right - you can see the potential here right? But - here's the good
bit - you're not limited to just one curve! What you just followed was single rail
extrusion - Now we go on to:
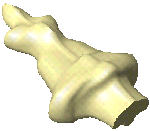
Multiple Rail Extrude:
Let's say for want of anything better - that you wanted to make a new
spacecraft - an organic one - loads of weird and wonderful shapes - - why don't we let
Modeller do some creative thinking for us. Make a base polygon for the initial
shape and then make four - YES - FOUR spline curves for the
top, bottom, left and right sides of the polygon shape you
made - A bit like this:
|
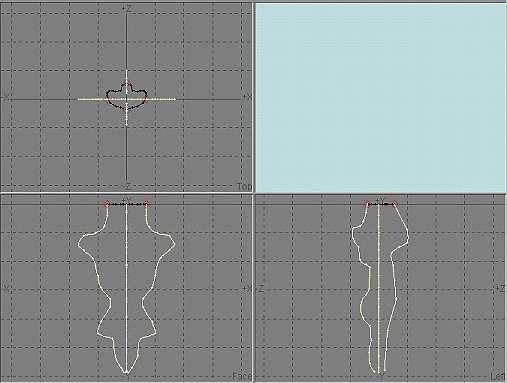
All I've done is mirrored the x curve and made a separate top
and bottom curve and of course the base poly. Switch back to the polygon layer and
apply a surface with 60 degree smoothing if it's not already been one. These curves are
going to act as shaping curves for the polygon.
Now this time when you choose rail extrude - a different requester will say
hello to you - It'll look like this:
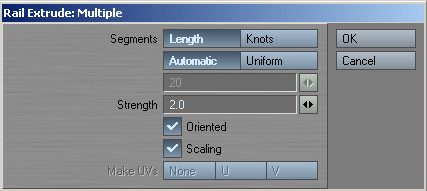
|
Right what do these options do?
Well by now you should know the difference between Lengths and Knots from
the previous lessons and how automatic or Uniform with manually set divisions work. But
what about Strength? Orientated? Scaling?
-
Strength: The value here determines how "aggressively"
the curves fight for control of the mesh as it's extruded. There won't be a visual
amount of difference unless you have scaling de-selected - but the higher the
value - the more the final mesh will try and "hug" the curves you've
created.
-
Orientation: well we've covered this - the divisions will try
and orient themselves to the shape of the curve - mostly in a perpendicular type
fashion in relation to the curve. If deactivated the division stay parallel to the
original polygon.
-
Scaling: If the curves spread apart - as they do here - the
mesh will automatically stretch outwards along those axes as well This command
gets a bit complicated - but let me try to explain. If we didn't have 3
separate curve shapes - like we have in the above example - you could
create the two x-curves as above and then extrude with scaling and the mesh
would be scaled on the y-axis in relation to the shape of the curves as
well.
The effect on the original polygon will be affected by how far away the poly is from the curves
at the start point - further away = less affect and vice versa.
IF THIS IS CONFUSING RIGHT NOW - DON'T WORRY
THE PICTURES LATER SHOW HOW AND WHY IT WORKS
Right let's rail extrude this poly and see what happens - to start with leave everything as
default - like the requester above - you'll get this:
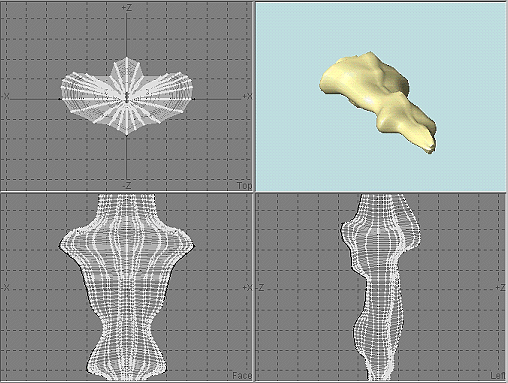
|
Cool eh? Imagine having to spline patch that baby!
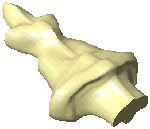
Right now I'll run through the options and how they affect the mesh using a
table with just the resultant OpenGL previews
Just click undo and redo the operation with the different
settings
|
|
Lengths - Uniform - 120 divisions -
Strength=2.0
Orientation & Scaling
|
|
|
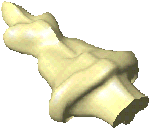
Knots - Automatic
Uniform with 120 divisions produces a similar result
Strength=2.0
Orientation & Scaling
|
|
|
Knots - Automatic
Uniform with 120 divisions produces a similar result
Strength=2.0
Just Scaling
|
|
|
Knots - Automatic
Uniform with 120 divisions produces a similar result
Strength=2.0
NO Scaling or Orientation
|
|
|
Lengths - Automatic
Strength=1.0
Scaling & Orientation
Note how the strength's lower value lessens the curves affect?
|
|
|
Lengths - Automatic
Strength=5.0
Scaling & Orientation
Note how the strength's higher value exaggerates the curves affect?
|
|
|
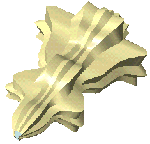
Now lets play with the original poly for a shadowy feel ;)
|
|
|
quite often with Lightwave you have to think laterally - do it the
easy way - not the hard way - ESPECIALLY if the resultant mesh doesn't need to
be superbly accurate..
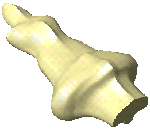
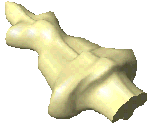
Take this for example:
|
Just make a disc - and four curves as shown then rail extrude
with these settings:
Lengths , Uniform, 60 divisions, Strength =
1.8, No Orientation - Scaling activated
And VOILA!
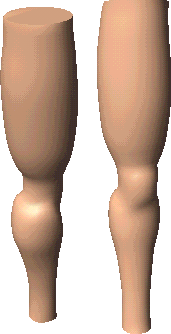
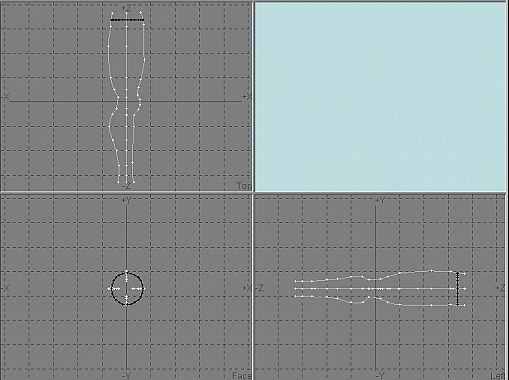
|
|
Now - show me a quicker way of modeling a basic leg mesh - and I'm all ears!
;o)
|
|
Need help
detailing your spaceships? Have to make a cityscape fast? Need to fill any area with random
believable detail?
The
Ultimate Greeble & Nurnie Collections will make light work of any of your Projects! Check them out now!

|


 Facebook
 Twitter