Set background images in Modeller - Part One

N.B. all bordered images link to larger versions...

First of all I would like to bring everyone's attention to a plug-in I have used ever since the days of LW v.5.6 called Supersize - you can get it here:
supersize-100.zip
The beauty about Supersize is that it allows you to size sections or whole layers proportionately and provides the ability to center the data anywhere you choose and is also useful for finding out where an object's actual XYZ centre is for things like placing lights etc...

Here is a quick little mini tutorial first for Supersize .

let's say you want to make a perfect sphere - well I never bother with the numeric bit for this I always just make a sphere and then hit the hot key for Supersize - my original quickly doodled sphere looks like this...

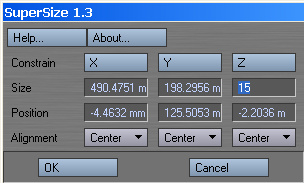
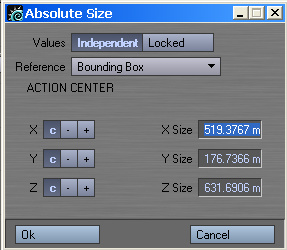
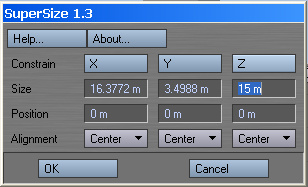
then I hit Supersize and a box pops up looking like this..

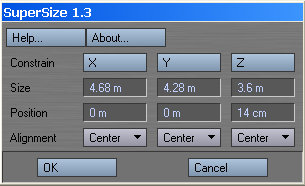
What the box tells me is this: 

For each of the size fields the plug-in is telling me the absolute dimensions of my object

The position fields are telling me where the centre of my object lies on the three axes.

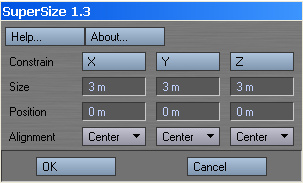
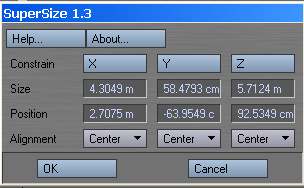
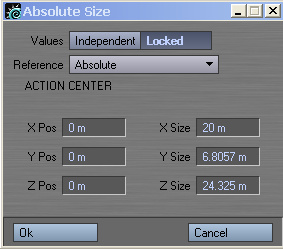
I now enter the following data:
merely highlight the first field enter the figure and press enter to go to the next field it becomes a very quick process when you use the numeric keypad..

..And then I click on OK and the result is a perfectly centralised sphere with 3 meters in each dimension like this..

click me for bigger image

Nice eh? And quick too when you get the hang of it. But Supersize has other tricks up its sleeve

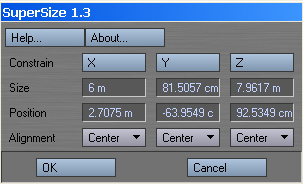
Now say I want to resize the ball? Well with Supersize again and this time just enter the new dimension in the X size field like this

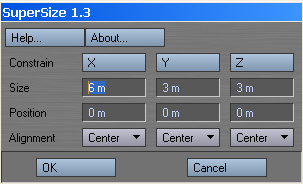
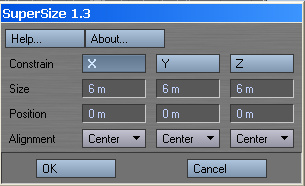
then I merely click the X button above the altered field and the other dimensions get re-sized proportionately!

The alignment fields then further also allow you to offset the center point to whatever amount you want from the baseline of 0 on all axes

This plug shows it's usefulness in situations like this...

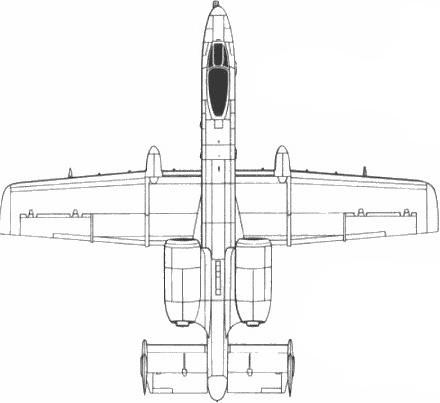
Proportionately resizing a whole mesh for instance...

click me for bigger image

Type in fifteen in the Z field hit the Z button and then hit OK

..And then you get a nice accurately down sized proportional mesh!

click me for bigger image

But, you can also use the plug-in on a selected section of your layer like so - pick a section - hit select connected and then resize just that section as before...
for example...
click me for bigge rimage

_

click me for bigger image

Unfortunately this plug-in only works on one layer at a time - but that isn't a major drawback because if you want to resize an entire mesh that is spread over a few layers then version 7.5 has a similar built-in plug-in up it's sleeve - but it isn't as intuitive in it's use - but here is how to use that for posterity's sake

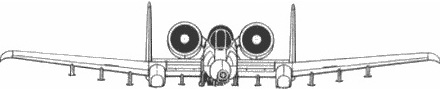
This mesh for instance is spread over several layers..

click me for bigger image

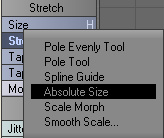
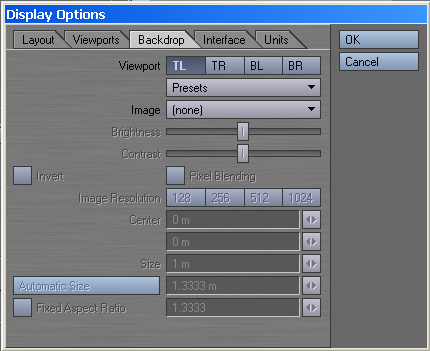
Now find this plug-in...

under the Modify tab --> Under STRETCH - More and you'll be presented with this...

change the settings to these from the drop down menus:

then enter a figure for the X box to enlarge or reduce the size of the entire mesh and simply hit OK - although the other two dimensions do not resize interactively; they do in the process itself -

So that's how you can proportionately resize a complete mesh that spans any number of layers

Set background images in Modeller - Part Two

N.B. all bordered images link to larger versions...

Now what was all this in aid of regarding backdrops eh? Well it'll become obvious soon enough.

Now we must first select some blueprints...I have chosen this for the tutorial:

The first thing we must do to these images is prepare them for our backdrops...
we must disregard the wheels for the moment as they will throw out the size of the resultant images -- what we are after is three images like this after we are finished with them in a graphics editor.

I have eliminated unwanted data in the images you may note

..now a good step in our graphics editor is to ensure that our images actually are proportional to each other; and to do this I usually take say the top view and measure the pixel dimensions with the image size tool - the top view in this set works out at as 440 pixels wide by 403 pixels high

So relative to the plane that’s a wingspan of 440 pixels and total length of 403 pixels - using this info we can adjust the "length" of the side view to 403 pixels and let the height adjust proportionately to suit. This will give us these results...403 long and a height of 94. So-- we already have the wingspan from the top view which we can apply to the front view now and we have deduced the height from the side view when we adjusted that and now in the front view we act on each of the image dimensions independently to get it to match perfectly...

Whatever we do now we know the images are sized correctly HOWEVER it must be noted that you will nearly always notice slight discrepancies when they are placed as backgrounds and you start to build - this is when artistic judgement comes into the picture.

Right then - how do we apply all this to the background? We have two methods available to us here

  • We have the actual dimensions of what it is we want to build
  • We don't have the dimensions but we want to ensure everything remains proportional..


Here's what you do if you haven't got any measurements to work with...
In modeller make a simple box.
Then hit Supersize!
Enter your pixel dimensions in meters into the relevant fields to get this...

Then run Supersize again and for the length enter a suitable realistic figure of say umm 15 m for now, in the Z field - then hit the Z button to resize everything proportionately. like so...

One of our images as it stands is facing the wrong way for our modelling purposes - it's the top view - it'll be easier for you to model the plane facing towards you I find so I will flip the top view 180 degrees..

Now go into your display settings panel:

First off use the image button to load all three of your background images one by one

for each of the relevant view ports

TL
top left (top)
TR
perspective view (normally)
BL
Bottom Left (front)
BR
Bottom Right(side)

Simply hit the automatic sizing button - adjust the background image resolution (if you have a good card go for max settings of 1024) and set the brightness and contrast to give an unobstructed view
like this example

with this result

click me for larger image

If you do have the dimensions of the object then merely when at the Supersize stage for your box enter them all in manually in each field!

There is one last thing to do now - and that is to safeguard all your hard work in preparing your backdrops.. do it this way... Back in display properties - Backdrop - click on the drop down for presets - drop to SAVE ALL BACKDROPS.. then save the config file for your setup somewhere safe - I suggest backing that up also

 Need help detailing your spaceships? Have to make a cityscape fast? Need to fill any area with random believable detail?

The Ultimate Greeble & Nurnie Collections will make light work of any of your Projects! Check them out now!

check out the ultimate nurnie collections!

 Back to top