Ever since the dawn of engineering
time (well okay slight
exaggeration there) engineers have
produced a surface dubbed knurling to enable
human hands to get a better grip on slippery metallic surfaces. It's usually produced by
using a special cutter that applies pressure onto the metal surface and is moved along
and rotated around the circular surface to produce a diamond shaped
profile.
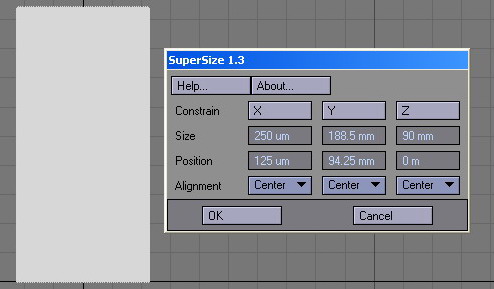
What we would need to do first is to
create the template for our knurling, let's say for example we know that our object to be
knurled is about 90mm long and 60mm in diameter . There are a couple of things we need to
prepare for first now. Knurling is "fairly" standard for most human sized objects as the
knurl is designed for our skin on our hands to grip well. A typical knurl diamond is
approximately 1.5mm long by
approx 1mm high.
so knurling is a
squashed diamond as opposed to say a equally dimensioned square rotated 45
degrees
In our example there will be
90/1.5 for the length which equals 60 knurls
we then need to work out the diameter
which would be PI*D (PI*60mm(diameter)) which equals 188.5
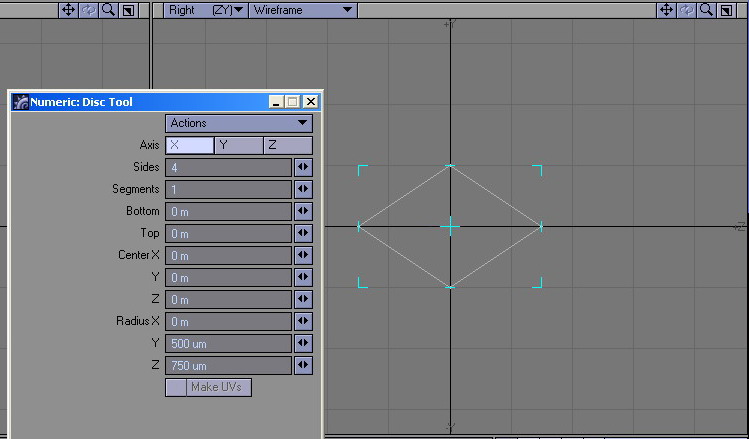
Now we first need to make our diamond.
Do this using the disc tool in one view port with sides set to 4 and then size
accordingly in the numeric panel like so:
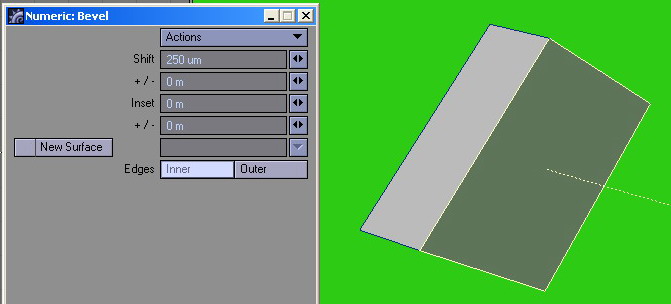
whilst we are here we can take care of
the diamond's shape by first creating a bevel with these settings:
then use the value tool to make the new
polygon conform to Y=Zero and
Z=Zero
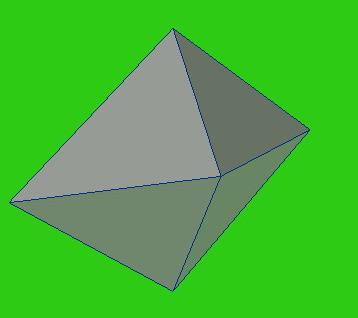
your polygon will
still be selected so importantly delete it now! Then merge points to
eliminate 3 points. You now have the basis for a knurl. Now that we have done this the
hard way - here is the easy way to do it ;)
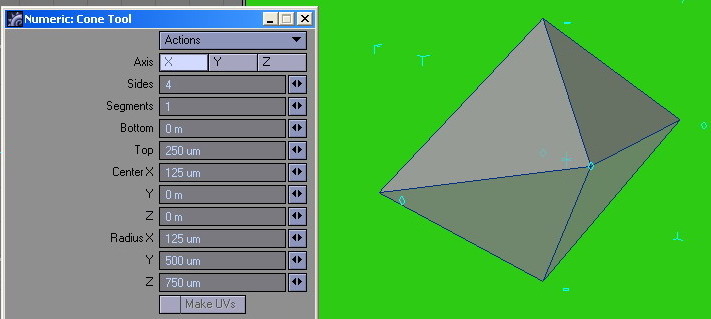
Pick the cone tool and use these
settings:
that was a bit easier
eh? 
Oh and don't forget to
DELETE that back facing 4 sided polygon if you use the cone
tool!
now we use the
clone tool:
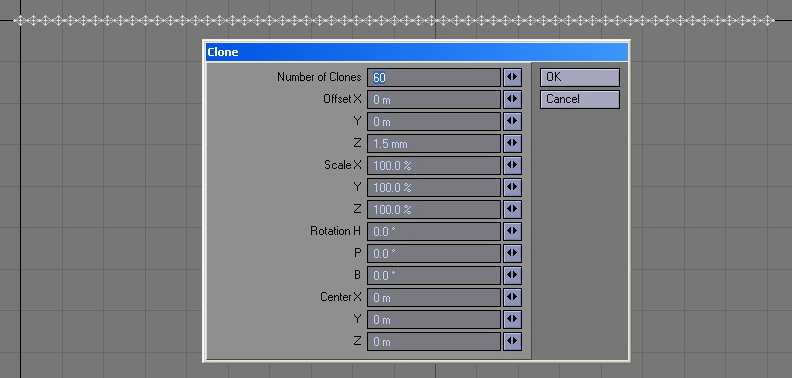
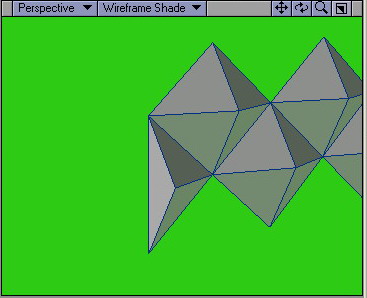
Before we do anything else now we have
to crucially do a special clone operation to fill in what would otherwise be eventual
gaps in our knurling operations and we need to use the clone tool to replicate our
row upwards and offset slightly like
this:
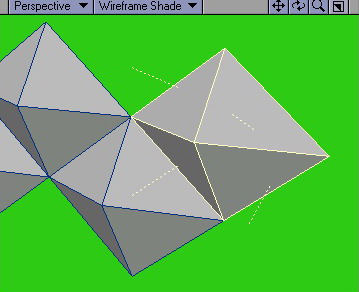
The next thing we do is to select these
polygons at either end of our clone array and merge them:
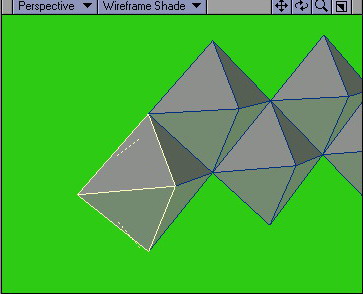
then select the point right at the end
and delete it - this gives us the final result of a
flat edge to our end knurls
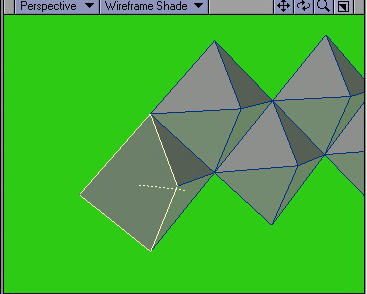
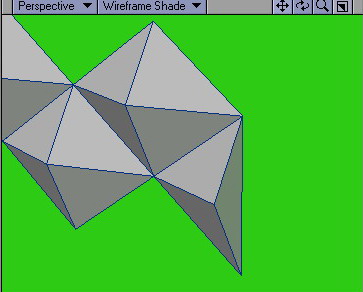
Remember also that on our other end we
have created one extra
knurl that we don't need as a result of
our offset clone operation - so on the other end first completely
delete this knurl:
and then take care of the end as
before:
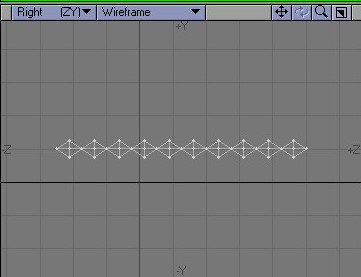
you will find now that if you measure
it it will be exactly 90mm long just as we
want it to be.
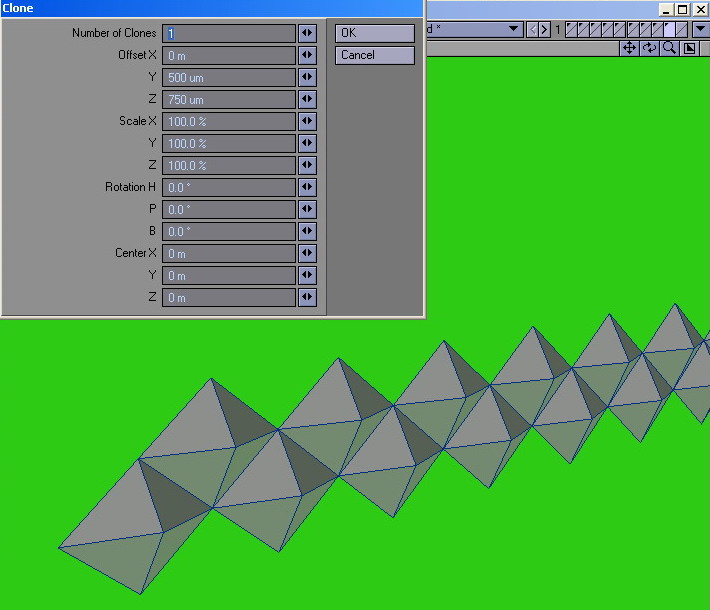
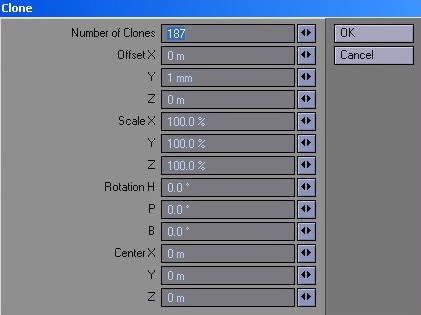
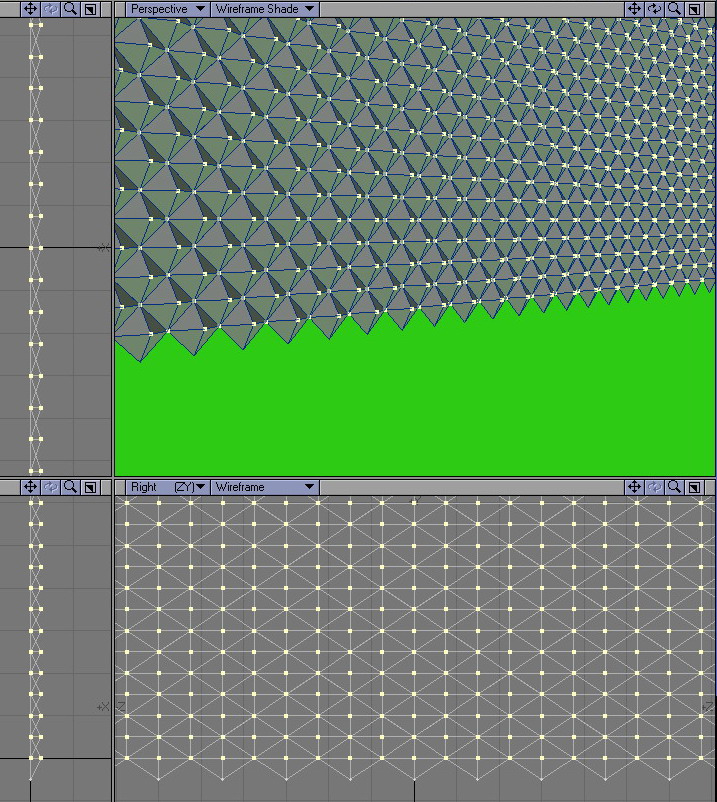
the next step is to use the clone tool
again this time for the vertical (or circumferal
replications). our circumference measurement
was 188.5 and the height of our two rows of knurls is now
1.5mm.
However to replicate our knurls properly we need to clone them at a distance of
1mm.
Every time we clone our two rows by a 1mm step we create a total
extra height of the same amount - 1mm. If we take away 1.5 mm from our
circumference we are left with 187mm and that gives
us how many times we need to clone our two rows.
and as we can see when the result is
measured we have exact dimensions!
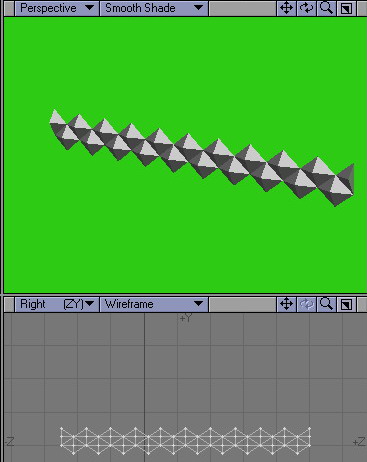
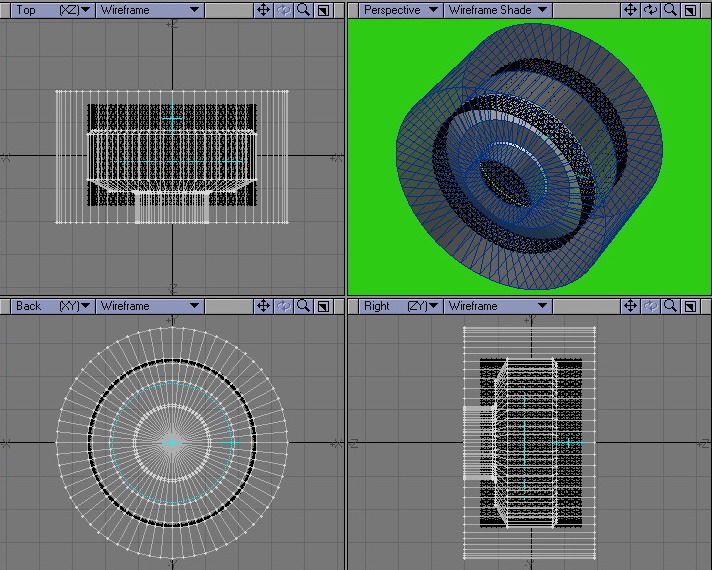
we now have Our knurling template - the
final step to complete it all is to use the bend tool.
first MERGE all the points
-You may need to use a tolerance merge of say about 5-10 microns to make sure you get
them all if necessary.
the bend tool is a tricky tool to
get right. We have to bear something in mind here - we need to bend this object around a full
360 degrees BUT we need the knurls to meet when we have finished.
The way to do this is to select points and bend just them - we need to ensure that our bend
operation starts at Y=Zero but that our bottom
most points sit at Y=
-0.5mm or 500 um.
for example..
Our bend settings need to then be
carefully calculated and set up we want our start to be Y=Zero and our end to
be Y=188mm
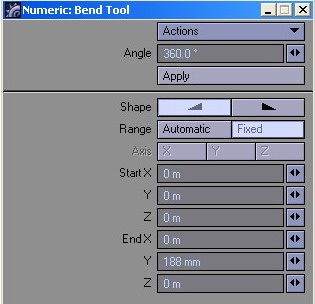
with these set we then bend our object
carefully in the top view port by hand. It's a very tricky process (and you can't even use the CTRL key to constrain
your cursor movement) but be careful
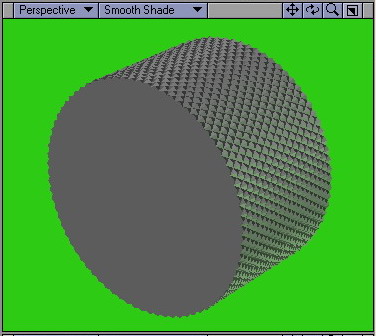
and the end result will be this. No matter how frustrated you get with the bend tool -
bear with it.

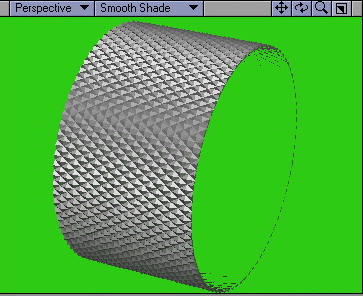
as you have no doubt observed making
knurls is an awkward but ultimately
rewarding process. Now that we have the principle of it committed to memory lets take a
look a adapting it to a real world example.
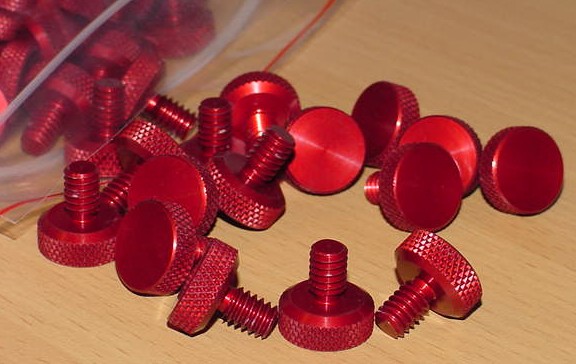
we're going to make one of
these (minus the
thread!). These knobs are roughly
20-25mm in diameter - I'm going to assume a 25mm diameter for the purposes of
this tutorial.
First Ii will start with my diamond
shape in modeler and make a clone array of 10 of them down the
Z axis
like so.
same as outlined previously I will
then make my second row above that using the methods we have gone through during this tutorial
for an end result long these lines:
as before we now have a object
comprising of two rows at 1.5 mm in height. Our knurled Knob is assumed to be a diameter of
25mm which gives us a circumference of (PI*25) 78.5mm . 78.5-1.5=
77 and
that gives us our clone figure.
As before when we have our template
we carefully set it up for the bend process which will give us this result when we are
finished.
Now pop to a
new layer - put that object into a background layer and create
the basis for your Knob using the background as a guide. We are going to be making a
Boolean cutting tool so we start off with something along these lines which we create using
the pen tool..
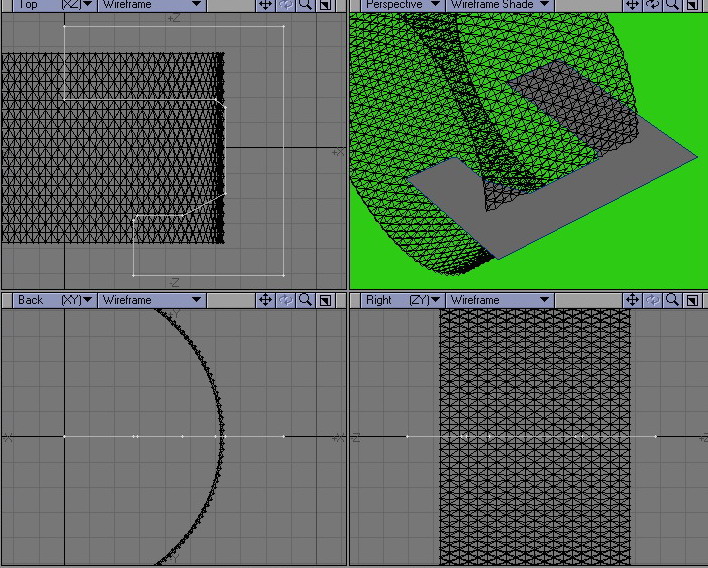
then
lathe this polygon to get this result:
all the faces should be facing
inward - so ensure you FLIP them. Now back to the
knurled object and cap off those end pieces in preparation for our Boolean operation like
so(hint - use the
select loop tool)
finally perform the
Boolean operation - when it's complete merge points using a tolerance of
say 25-50um and then eliminate single and
double sided polygons and admire the end result:
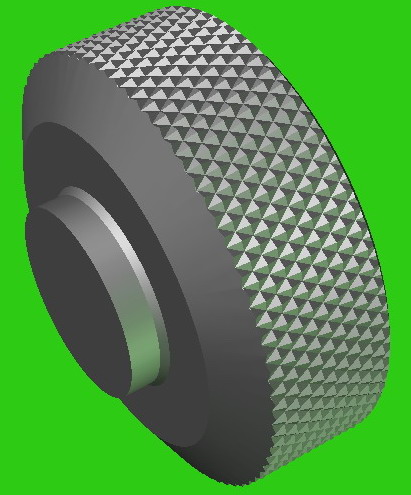
now in retrospect it looks like our
knurls were a but too small for this object in that case - use what you have learned to do the
same with larger diamonds knurls to start with :)
Here endeth the lesson!
tutorial copyright 2005 - F.Passaro
P.S. I also have several other methods of doing this knurling effect
that rely on plug ins like KW Edge Smoother and Vertibevel - maybe in the future I will
add to the tutorial


 Facebook
 Twitter