Making the actual map for your object.
At this stage it really helps if you still have the spline cage for the
object you want to make a map for. If not - it doesn't matter all that much - it just
makes things a little less cluttered visually - anyway load your model into modeller -
place it in the view you want to map - some quick tips here for modeller
display:
Numerical keyboard (The one on the right!)
7 Gives Top View - full screen
9 Gives Preview - full screen
1 Gives Face View - full screen
3 Gives side View - full screen
4 & 6 shares on the screen 7 & 1 and 9 & 3 respectively
5 Gives all four views
(Note: You have to manually configure these holding down the alt key with whichever letter you
want for that view!)
if you do or don't have the spline cage:
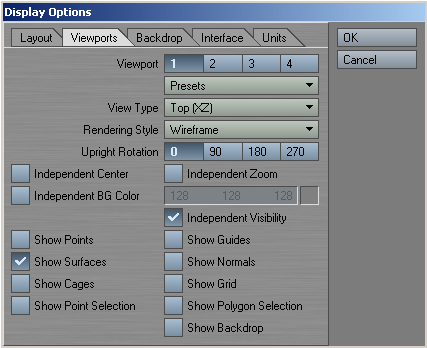
Now with the object in the view you require click display options
"d" ; Verify the correct view port and choose these setting:
|
|
|
Now press "a" to make the object fit the screen - use the polygon
lasso - selection with "]" key or the surfaces panel to select the objects you
don't want to see and hide them with the "-" key. Then using the infamous
"Print Screen" button capture it and transfer it to your graphics
editor.
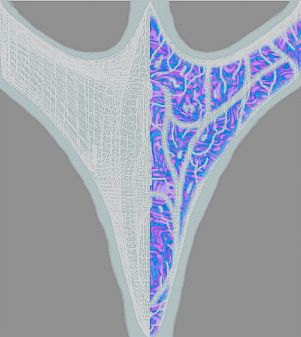
If you had the spline cage you'd get this:
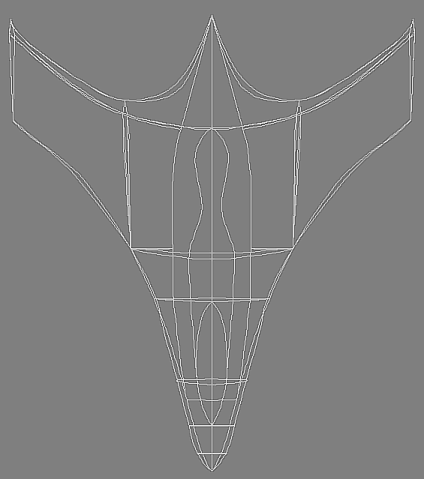
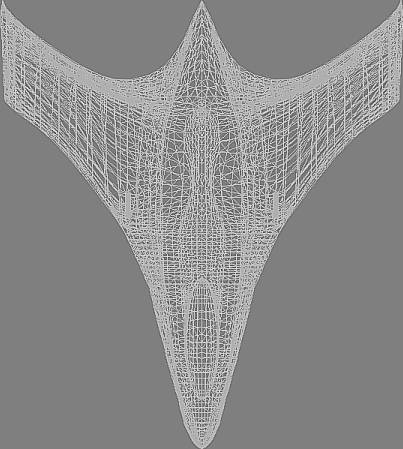
And if you didn't have the spline cage - you'd get this:
We'll now use these as painting templates for our texture map.
|
Making the final map in Photopaint.
I'm going to use the non-spline capture for the rest of the tutorial for
those of you who don't have them - i.e. downloaded model that you want to re-texture --
just to show you it matters not to the final outcome. Now in Photopaint crop the image
to the edges of the object - like so:
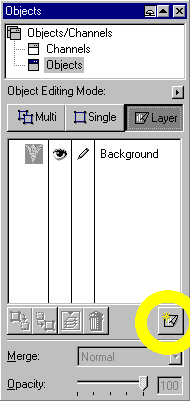
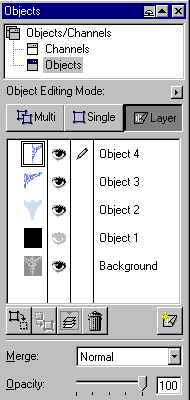
Now - make sure that you have the Objects/Channels roll-up displayed
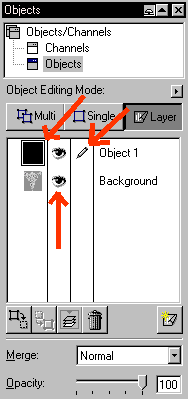
and click on the layers button and you'll see this :
|
The file is now the background object.
Click on the indicated button to add a new layer - think of layers
as sheets of paper - layers allows you to have many sheets of paper on top of each other
- some visible - others not - some transparent - others not - you control how they are
finally merged and can create a single graphic from elements that you choose. Select your
new layer and color it completely black with the fill tool. The box around the
preview means that layer is selected for applications of filters etc.. more than one
layer can be selected at a time. The pencil means that the layer is selected for direct
editing - only one layer at a time; and the eye toggles the layer on or off - i.e. you
can see it or you can't.
|
Every time you create a layer it will be constrained to the same size as the
initial background layer and it will initially be transparent until you paste an
object or adjust it directly.
Now create another new layer - select it for editing make the black layer
invisible and you will have a transparent layer through which you can see the
background i.e. your template of your object. With the new layer selected pick a nice
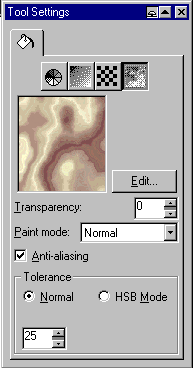
brush with a soft edge (adjust the brush using the Tool Settings roll-up) and pick
a base colour for your object and paint over the template - remember you're not painting
the template but the new transparent layer - just like old style
animating.
Paint over the edges of the template to ensure there are no problems when
applying the map in Layout later.

|
Now here comes the fun bit:
Make a new layer - if you haven't done so already make the layer above
transparent as I have done -- so that you can see the template. Select the new layer you
made for editing and then load up the texture you made earlier into the Graphics
editor.
You should now have two files open - the one we've been working on
and the texture file. Make them both full screen size and then select the texture so that
it's the one you can see - use the windows drop down menu to select the window you
want to see.
Now get the clone tool - ensure you have the clone tool set with a
nice soft edge so that it will blend well with the base colour later - place it
roughly in the centre of the texture and press ALT + Right click your mouse
- the cross hair should stay put.
Then select the other window and start cloning the texture
to the new layer you made earlier - using the template as guide to where you want it
to be.
Concentrate only on one half of the object - as this map will require
symmetry - we'll deal with it later - for non symmetrical maps just cover the area you
require.
|
Finishing Up.
This is what you are aiming to get after you've cloned your texture to the
new layer - if you find that at certain points you stop cloning the texture - it's
because it's source has run to the edge of the clone source image- so go back to
reset the clone source point -- return to the layer and continue
cloning - the soft edge of about 85-100 will ensure that it blends
well.
.
|
If the colour looks to vivid - don't worry - that will be sorted out
later too -
This part deals with achieving the veining effect of the
Minbari-Vorlon hull and to do that we use the eraser tool with a soft edge
of about 95-100 - working on the new layer you created just now -- start
erasing parts of the texture that you don't want - but to make it easier for your eyes
and judgement -- make the layer about 50% transparent first so you can see
the hull template and erase at the points you require - a good idea would
be to make the base coat invisible here to stop it cluttering your
view.---Again only concentrate on the one side -- I used the mask tool to erase
down the centreline of the hull before I started erasing.
|
|
|
|
|
. 
|
Now - for Photopaint at least remember that these layers are
objects in their own right - so select the object you have just created in this
layer - the veined texture - bring it's opacity back to 100 and copy it.
Then paste it into the same document as an object. A new layer will appear in the
layers window with a duplicate of the texture. |
|
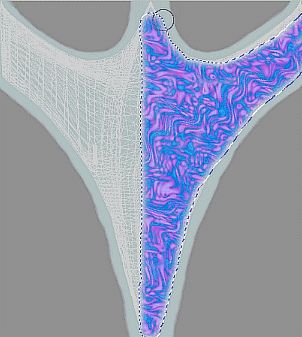
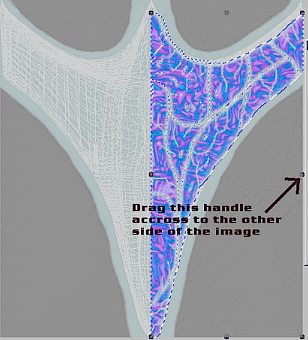
Select the object in the new layer and using the handles select
the right handle and drag right across to the edge of the image on the left side - this will
in effect mirror the texture across the central plane. Now Photopaint won't let you do
anything more until you right click on the object and select apply to effect the
changes to the object.
|
|
Nearly done now!
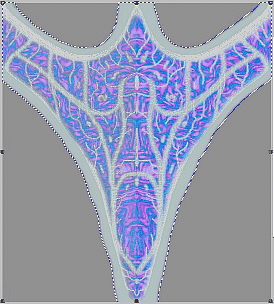
select the two veined texture objects (see window - on right) then click on
Objects-Combine-Combine Objects Together - and you will make one single layer from the
two and have a symmetrical texture map.
|
|
And now for the last hurdle
Make the base coat layer - object 2 in the previous window - 100
percent visible again and adjust it's opacity to 100 also.
Then make the black layer visible too
Then select the new symmetrical map you just made and adjust it's opacity til you get the level you
want.
Finally select all the layers except the background and do the same as before:
Object-Combine-Combine objects and you will have made your texture map.
Finally cut or copy this final layer - paste as a new document and save it as your
Final map for application in Layout to your object.
Once you practice it really gets easy and is even easier for non-symmetrical maps as you'd have
finished it long ago. Now obviously this map is a little bit untidy - as I did it quickly for the
purpose of the tutorial - but just take your time on your maps as the effort really does pay
off
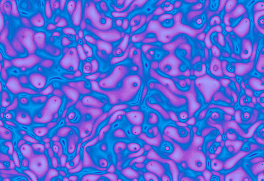
Making specular maps is easy - gamma the image down - up the contrast and save
as the specular version of the map :o)
Right what are you waiting for - get mapping!
|
|
Need help
detailing your spaceships? Have to make a cityscape fast? Need to fill any area with random
believable detail?
The
Ultimate Greeble & Nurnie Collections will make light work of any of your Projects! Check them out now!

|


 Facebook
 Twitter